Visualise your Obsidian notes with Qwen3
Many users with stringent security, privacy or latency requirements have told us they prefer to run their own LLM instances locally. We recently added support for interfacing with Ollama models running locally.
To explore how we might use a local LLM practically, we decided to build an app that could turn an Obsidian note into a concept map – a visual diagram that shows how different ideas in the note are related. As an early stage startup we've actually been building our internal apps on top of local LLMs to keep our costs low: we use the obsidian app in this post to visualise notes coming out of our weekly engineering design meetings!
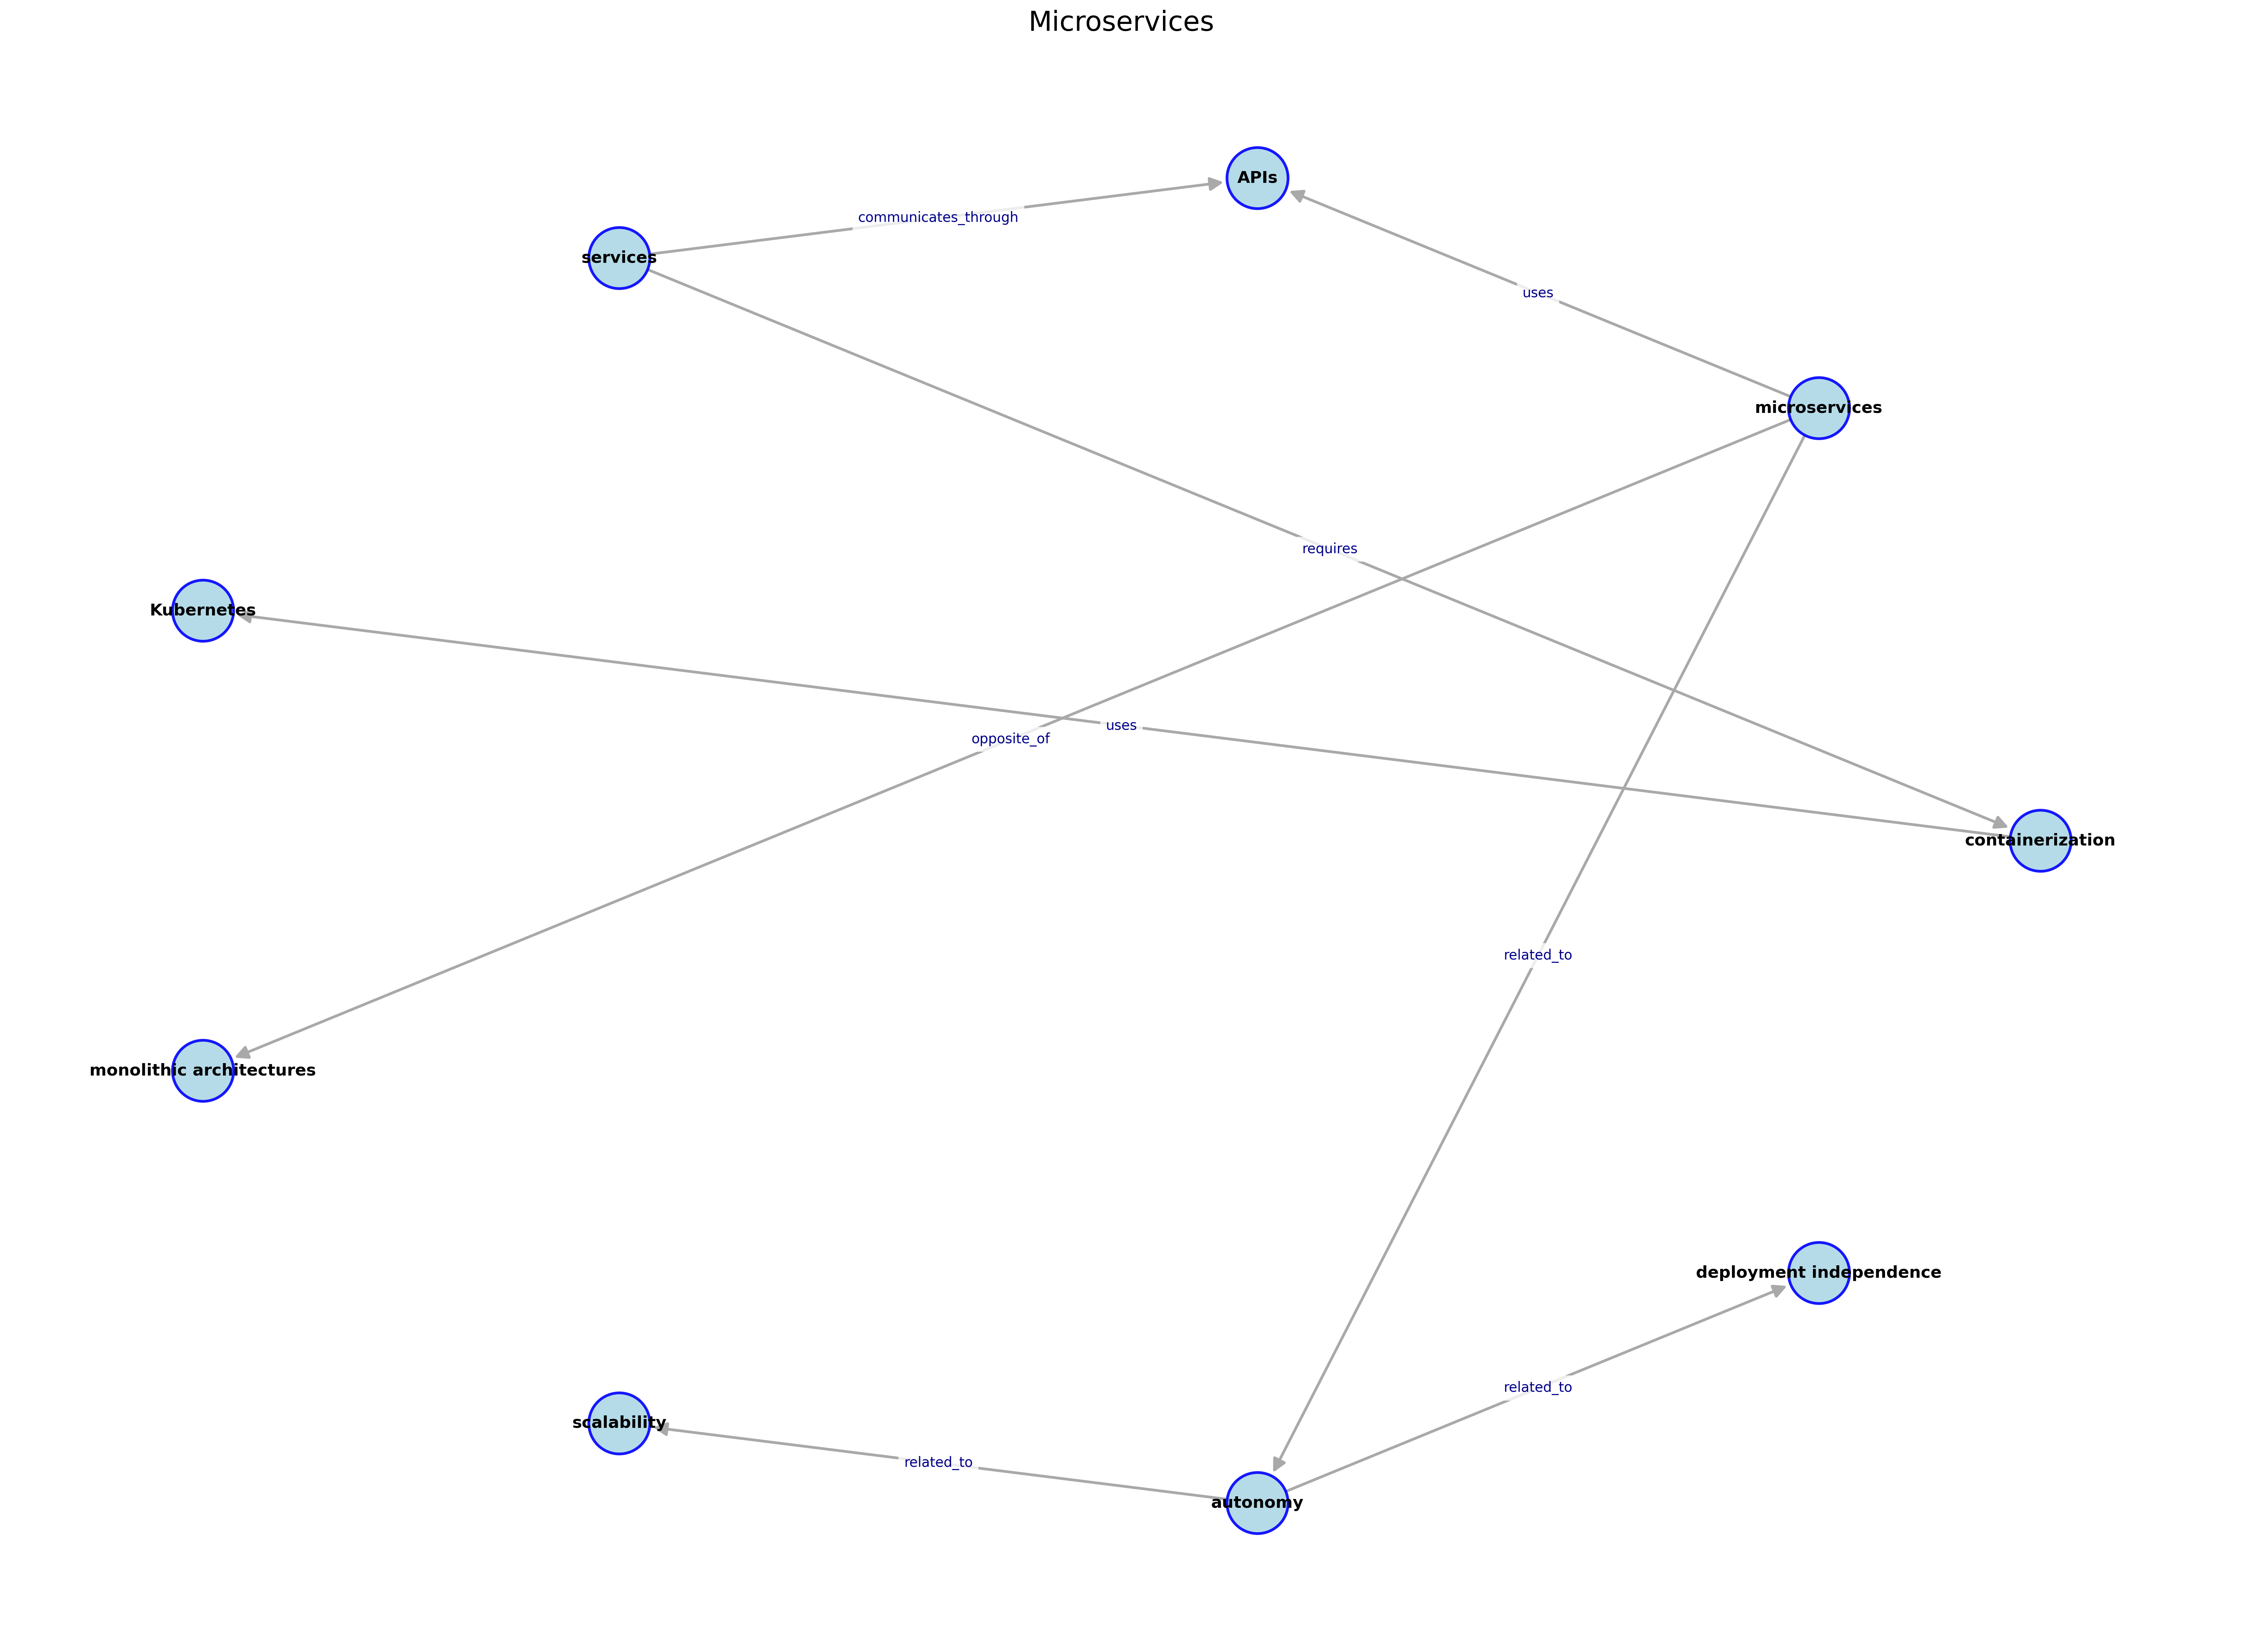
The app reads a single note, uses Qwen3 4B to analyse its contents, extracts relationships between key concepts, and outputs a PNG file with a graph-style visualisation. The entire process runs locally, using Portia AI to handle orchestration between tools.
Obsidian is a great app for storing notes
If you're serious about organising ideas, thoughts, or long-form research, Obsidian (↗) is one of the best apps available. It's fast, extensible, and designed around a powerful but simple principle: your notes are plain text files that are stored locally by default (in Markdown).
Why local LLMs are worth using
Most people experience language models through cloud-based APIs like ChatGPT or Claude. These are large, powerful models hosted on someone else's infrastructure. But for many developer workflows – especially apps that run against your own local data – there's a strong case for running smaller models directly on your own machine. The Portia AI SDK supports all models that can be run by Ollama.
| Tradeoff | Local LLMs | Hosted LLMs |
|---|---|---|
| Privacy | Everything stays on your computer | All prompts and data are sent over the internet |
| Latency | Near-instant results | Slower, network-dependent |
| Cost | Free after setup | Pay-per-token or subscription |
| Control | Full control over the model and environment | Limited access to fine-tuning or weights |
| Accuracy and context | Smaller context windows, less precision | Larger, more capable, and usually more accurate |
| Setup complexity | Requires installation and some configuration | Works out of the box with API key |
Why we chose Qwen3
We decided to use the Qwen3 (↗) family of models from Alibaba’s open-source LLM line. These models are trained with multilingual capabilities and perform well even at smaller sizes.
The Qwen3 4B model in particular offers a nice balance:
- It can run comfortably on machines with under 10GB of VRAM
- It’s available through Ollama, which makes setup simple.
- It’s reasonably competent at task execution and factual recall, especially for structured prompts
That said, Qwen3 4B can and will make mistakes, especially when extracting subtle relationships or summarising long-form content. That’s a tradeoff we accept for speed and local control.
What does this app do?
Let's talk about how to run the app, and what it does, before going into the code.
You can run the app with uv run main.py NOTE where NOTE should be the name of one of your notes in an Obsidian vault.
In the provided Obsidian vault, there's a note called DDD, all about Domain Driven Design.
So you could call the app with uv run main.py DDD.
The app will then configure an explicit plan, consisting of the following steps, using Portia’s plan builder:
| Step | Tool |
|---|---|
| List all available vaults | MCP Tool call |
| Fetch the note from the obsidian vaults | MCP Tool call |
| Create a concept map visualization using the extracted relationships | Custom visualisation Tool |
We chose to configure an explicit plan rather than rely on Portia's planning agent because tests showed Qwen3 4b to be unreliable at planning. In this case, the plan is always going to be the same, so it makes some sense to outline it explicitly in code using the PlanBuilder interface.
The plan is passed to Portia, which has been configured to use Qwen3 4b via the Ollama interface. (We'll show you that below.)
Ollama (↗) is a free, open-source app that allows you to run large language models (LLMs) locally on your computer or a server. It currently supports 30 different models (↗).
Diving into the code
Let's take a deeper look at the app, and what the code looks like. All the code is available in our example code GitHub repo (↗).
We're not going to cover every line of code in this project. If you want to see all of the code, check out the full code example. We'll guide you through all the important code below.
Configuring Portia to use a local LLM
Portia supports running local LLMs via Ollama (↗). At the moment, that’s over 30 models, including Meta’s Llama Series, the Qwen series of models that we’re using here, and many others. The only requirement is that when you specify it in code, the model name begins with "ollama/" and then the specifier for the model you wish to run.
config = Config.from_default(
   default_log_level="DEBUG",
   default_model="ollama/qwen3:4b",
   execution_agent_type=ExecutionAgentType.ONE_SHOT,
)
Portia offers two types of execution agents that take care of executing a step. DEFAULT (↗) agent which is parsing and verifying arguments of the tool to reduce hallucinations or made up values before the tool is called. This is recommended for complex tasks and tools that have complex parameters (with defaults..etc). ONE_SHOT (↗) is faster and more cost efficient when the tool call is simple. We generally recommend using ONE_SHOT for smaller models (like Qwen3 4b) as our default agent is optimised more for larger, more capable models
Adding the required tools
An MCP server (↗) already exists for Obsidian, and luckily Portia makes our lives much easier by supporting MCP out-of-the-box! The code below installs and runs obsidian-mcp locally via npx. The visualisation tool is part of this project, and is included in the code-base. (We'll tell you more about the visualisation tool in a moment.)
obsidian_mcp = McpToolRegistry.from_stdio_connection(
   server_name="obsidian",
   command="npx",
   args=["-y", "obsidian-mcp", os.getenv("OBSIDIAN_VAULT_PATH")],
)

# Add all tools to the registry
tools = obsidian_mcp + ToolRegistry([VisualizationTool()])

portia = Portia(
   config=config,
   tools=tools,
)
Once the tools have been configured, they're passed to Portia's constructor, along with the required configuration.
Vibe coding a visualisation tool 🏄🏻♂️
Because we're on-trend at Portia, we decided to vibe-code the visualisation component, which renders concept maps from the relationships extracted in each note. Omar wrote the visualisation tool quickly, guided more by intuition and immediate usefulness (and a dash of Spidey sense) than formal design specs.
It was an ideal candidate for this approach because:
- The requirements were loose: "make a diagram that looks decent"
- It could be tested easily and repeatedly with mock data
- The failure modes (e.g. cluttered layout, hard-to-read arrows) were visual and obvious
It was fun to build, and it works reliably, but we don't recommend using this code in production, and we're not going to talk about it here! One does not simply vibe code one’s way into production.
Making a plan
We've designed a plan explicitly for completing this task. Using the PlanBuilder interface is useful when you want to implement a simple and / or repeatable plan. It's also useful in cases when the underlying LLM available is not strong at planning tasks as is the case in this example.
Another option to increase reliability is to use Portia's new User Led Learning (↗) feature to guide future planning in the right direction.
The following code can be found in the create_plan_local (↗) function.
plan = (
   PlanBuilder(
       f"Create a concept map image from the note with title {note_name}"
   )
   .step(
       "List all available vaults", "mcp:obsidian:list_available_vaults"
   )
   .step(
       f"Fetch the note named '{note_name}' from the obsidian vaults",
       "mcp:obsidian:read_note",
   )
   .step(
       f"Create a concept map visualization using the extracted relationships. Title the image {note_name} and output the image to the directory {os.getenv('OBSIDIAN_VAULT_PATH')}/visualizations",
       "visualization_tool",
   )
   .build()
)
Putting it all together
And, honestly, that's kind of it. This plan can be provided to Portia's run_plan method,
and Qwen will read the Obsidian note specified with args.note, will generate a concept map,
and add it to a visualisations directory in your Obsidian vault!
plan = create_plan_local(portia, args.note)
portia.run_plan(plan)
The quality of the results can be a little varied, depending on the source material, and how the Qwen3 model is feeling when you run it.
What did we learn?
- Qwen3 4b is very capable, given its small size and requirements.
- It can be unreliable at planning and sometimes even tool call generation for some cases that require big inputs.
- Planning issues can be avoided if you are able to explicitly design a plan or use User Led Learning (↗).
- Our
ONE_SHOTagent is catching up on accuracy of theDEFAULT_AGENTover time due to the fast paced improvement on the models. We’re constantly evaluating the performance of both agents (on openai 4o and claude 3.5 latest). TheDEFAULT_AGENTis still doing better at resolving more complex tasks that require tools with lots of parameters.
There are many reasons you might want to run local models, and they come with upsides and downsides. Ultimately whether you use something like Qwen3 locally, or a larger model remotely comes down to your own requirements, and what suits them best
Next Steps
You should definitely give our SDK Repo on GitHub (↗) a ⭐️!
- If you enjoyed this post, check out our other post on User Led Learning (↗), a Portia feature that can dramatically increase the reliability of your agent's planning.
- If you want to build agents that can interact with websites check out our most recent post on local and remote browser integration (↗)